ATTIC INSULATION TIPS
- Do I need more attic insulation?
- What is the recommended R-value for the climate I live in?
- What is the best insulation for my attic?
- What tools do I need to install insulation?
- What do I need to know before installing insulation?
- How do I install my new attic insulation properly?
There are several reason for heat loss, one of the most common ones is inadequate attic insulation; since heat rises that is one of the first things you should check if it stays cold in your home or your furnace seems to run almost constantly.
1.If you live in a colder climate where you get lots of snow, one sure sign of severely inadequate attic insulation is if the snow on your roof always melts off before all your neighbors roofs melt off. There are other ways to check as well since the recommended amount of insulation varies by climate, you should check with your local housing authority to find out how much you need.Insulations is measured by “R-value” which stands for “thermal resistance value”. The higher the R-value, the more heat it retains.
2. Once you determine what the recommended R-value is for your home, you need to check your attic and find out how much you already have and subtract that from the recommended amount in order to find out how much you need to add. E.g. if recommendation is R-38 and you have R-19, you should add R-19 in order to bring it up to an R-38 value.
The first thing you need to know once you get into your attic is where to and where not to step. Some attics have a walk board across the framing and some do not, if your attic has a walk board in it that is where you should walk, if it does not then you should step on the framing or “ceiling joints” DO NOT step between the framing in your attic or you will fall through the ceiling and in turn cause extra expense to repair that no homeowner wants.
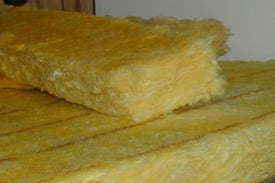
Now in order to find out what R-value you already have you must determine the type of insulation thats in your attic. There are several different types of attic insulation, the three most common are : Rolled fiberglass, blow fiberglass, and blown celulose.
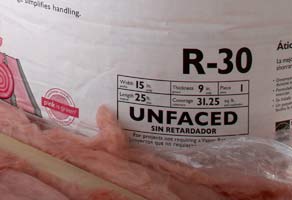
If you have rolled fiberglass insulation in your attic the first way to find out the R-value is to simply lift a piece up and see if it has paper facing on the bottom of it. If it does then it should say the R-value. If it does not then measure the thickness and call your local hardware store, they should be able to tell you what R-value it is.
If you have blown insulation, but cannot tell which type by looking at it, put a handful in a bag and take it to your local hardware store and they will tell you. Also measure how deep it is in your attic from the bottom of the ceiling joints to the top of the insulation.
Now that you know the type of insulation and the thickness of it, simply find a like product and it will have a chart on the package telling you what R-value the measurement you have contains.
3. Now that you know what R-value you have and in turn how much more you need, it is time to decide what type you should add. There are several factors to consider before deciding which insulation is right for you, including the cost and base of insulation. I would recommend a blown insulation mainly because it fills all the gaps and there are no joints in it. Remember that anywhere there is a gap in your insulation, heat will escape and drive up energy bills; even if you have a rolled insulation now, I would recommend adding a blown insulation over it. Also if you use a blown insulation you do not have to measure, cut and crawl around all over your attic. A lot of home improvements warehouses will loan you the blower to install your insulation when you buy the insulation from them. The blowers are very easy to operate but require two people, one person to feed the machine and the other person to blow it inside the attic; if you choose to roll one person could manage the install alone.
 4. Once you decide which insulation is the right fit for you, you need to get the right equipment to do the hob. You will need a light source, goggles, breathing masks, gloves, long sleeves, ladder, tape measure and a utility knife or scissors.
5. There are two things you need to remember while installing your insulation, First do not cover sofit vents, second, do not cover electrical boxes. You only need to install your insulation over living areas, when you get close to the edge of your attic, you should stop where the outside wall meets the attic floor. In most homes that will be 12-18 inches from the end of your ceiling joints, if you cover your sofit vents, your attic will not be able to “breath” properly and could cause your roof to age prematurely. While it is important not to cover sofit vents it may be even more important not to cover electrical fixtures since electricity generates heat it could be a potential fire hazard.
6. If you decided on a roll insulation you should set up a ladder, put safety gear on, set up light source (I like to use a head lamp) and you’re ready. Measure your first piece and cut it, you can cut it with scissors or (like I do) a utility knife. If you use a utility knife, it cuts really easy if you lay a board under where you want to cut then set a 2x4 on top of insulation. Hold down the 2x4 flat on the insulation and simply slice down the side of the 2x4, then install. If your insulation has paper facing on it, install with the paper facing down, make sure to cut out around electrical boxes, leaving approximately an inch on each side of the box. Your first layer of roll insulation should run between your ceiling joints and the second layer should run the other direction across the ceiling joints with a cross cross pattern. This is much more effective because you won’t have any gaps between pieces directly over other gaps. Any time you run into rafter supports, simply cut insulation as tightly as possible to fit around them and continue until finished.
 If you decided on a blown insulation, set up a ladder, put on safety gear, and set up light source. There are several ways to keep electrical boxes free of the blown insulation, my favorite way to do this is by getting a 4x8 piece of aluminum faced foam board 1/2 inch think and a roll of aluminum tape and mark boxes to go around the electrical boxes. With this method you can do more than just protect your electrical boxes, you can also use the for gages. For example if you need 24 inches of insulation and you have a 2 inch by 4 inch box, cut 2-4 inch by 24 inch pieces of the foam, then cut 2- 6 inch by 24 inches pieces of the foam, stand the foam up tape them together into a 4x6 inch by 2 ft box with both ends open, then place over the electrical box. Once you have done this to all your electrical boxes, you can blow your insulation until its level with the boxes you made and then you are done.
Regardless of which type of insulation you choose for your attic, properly installing it will pay for itself over time and you can enjoy years of warmth and comfort knowing your money is no longer floating away through the ceiling.